In today’s distributed IT environments, system administrators require efficient tools to manage remote Windows Server infrastructure without physical access to each machine.
Remote Server Administration Tools (RSAT) serves as the cornerstone solution for this challenge, enabling comprehensive server management from Windows 11 workstations through PowerShell automation.
In this tutorial, we will learn a systematic approach to RSAT deployment on Windows 11 and Windows 10.
Prerequisites: Administrative privileges on the target Windows 11 system are mandatory for successful RSAT installation.
Understanding RSAT Architecture and Components
Remote Server Administration Tools represents a collection of GUI tools and command-line utilities designed to manage Windows Server roles and features remotely.
The modular architecture allows administrators to install only the specific components required for their operational needs, reducing system footprint and potential attack vectors.
Step-by-Step RSAT Implementation Process
Step 1: Open PowerShell with Administrative Privileges
The initial step involves launching PowerShell with elevated privileges to ensure proper system-level access:
- 1. Access the Start menu interface
- Input PowerShell in the integrated search functionality
- Execute a right-click operation on “Windows PowerShell”
- Select “Run as administrator” from the context menu
This administrator elevation is critical as RSAT installation requires modification of system-level Windows capabilities, which standard user permissions cannot accomplish.
Check for Available RSAT Components
Before proceeding with installation, administrators should conduct a comprehensive assessment of available RSAT components using the following PowerShell cmdlet:
Get-WindowsCapability -Name RSAT* -Online
This command leverages the Windows capability management system to query the online Windows Update catalog, returning a structured object containing:
- Name: The specific RSAT component identifier
- State: Current installation status (NotPresent, Installed, or Available)
- Description: Functional overview of the component
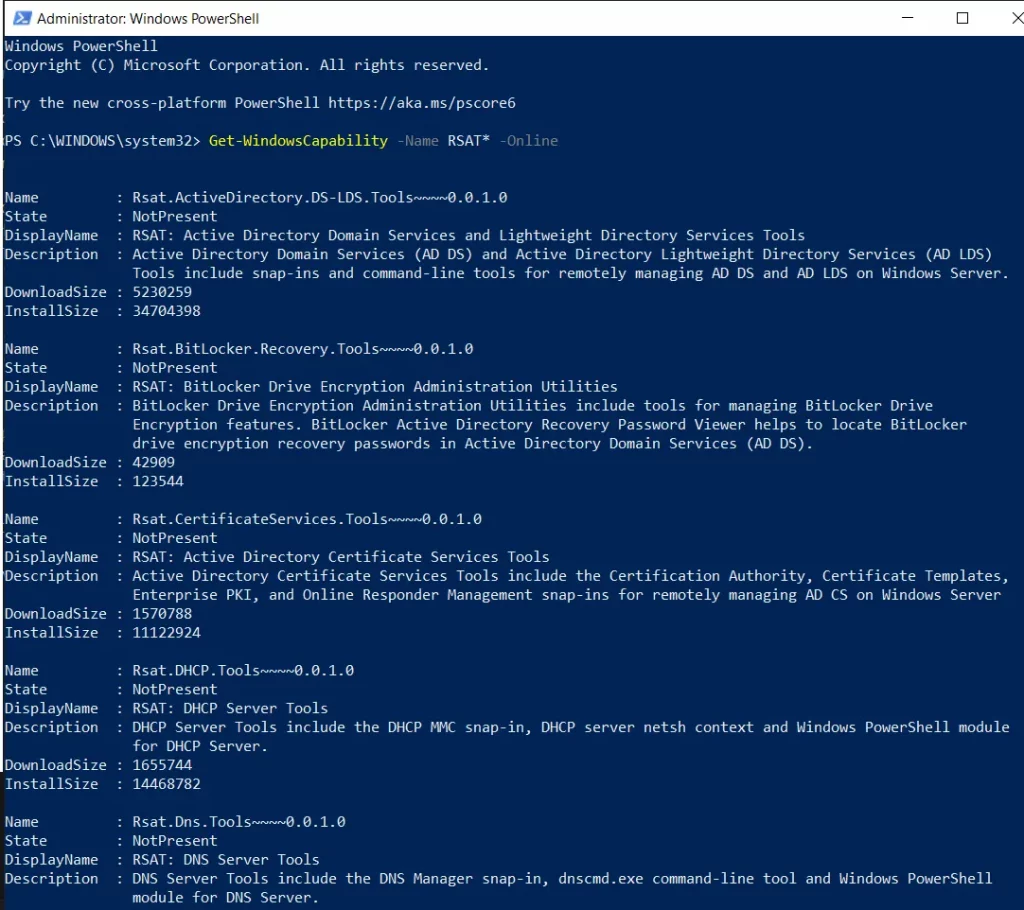
The semantic structure of RSAT component names follows a consistent pattern: Rsat.[ServiceName].[ComponentType].Tools~~~~[Version], enabling programmatic parsing and automated management.
Specific RSAT Component Installation
Based on the assessment results, administrators can install specific RSAT components using targeted commands. For Active Directory Domain Services management, execute:
Add-WindowsCapability -Online -Name Rsat.ActiveDirectory.DS-LDS.Tools~~~~0.0.1.0
The -Online parameter instructs the system to download the component from Microsoft’s update servers, ensuring the latest version is installed. This approach eliminates the need for offline installation media and maintains version consistency across the organization.
RSAT Component Verification and Validation
Post-installation verification ensures successful deployment and system integrity. The following command filters installed RSAT components:
Get-WindowsCapability -Name RSAT* -Online | Where-Object State -eq 'Installed'
This query utilizes PowerShell’s object pipeline to filter results based on the State property, displaying only successfully installed components. The output confirms installation success and serves as documentation for compliance purposes.
Conclusion
The successful deployment of RSAT on Windows 11 through PowerShell automation represents a fundamental capability for modern IT infrastructure management.
This methodology provides administrators with the tools necessary to maintain enterprise-grade Windows Server environments from centralized workstations.