In PowerShell, you can adjust and control the width when using the Format-Table cmdlet in several ways.
Method 1: Format-Table Column Width Using the AutoSize parameter
Get-Process | Format-Table -AutoSizeThis example adjusts the column widths to fit the content by using the Autosize parameter.
Method 2: Format-Table Column Width Using the Width parameter
Another way to limit the width of a specific column is by creating a calculated property with a custom expression.
Get-Process | Format-Table `
    @{Label="Name"; Expression={$_.Name}; Width=20}, `
    @{Label="Id"; Expression={$_.Id}; Width=8}, `
    @{Label="CPU"; Expression={$_.CPU}; Width=10}, `
    @{Label="Memory"; Expression={$_.Memory}; Width=12} `
    -AutoSize
This example adjusts the column width for each column individually in Format-Table.
Method 3: Format-Table Column Width with Out-String cmdlet
Get-Process | Format-Table | Out-String -Width 300This example controls the width of the entire table by piping the output to the Out-String cmdlet with a specific width value.
All these methods can be used to control the width of columns in the Format-Table output to a table.
The following example shows how to use each of the methods.
Format-Table Column Width Using the AutoSize parameter
The Autosize parameter adjusts the width to fit the content. This ensures that the columns are wide enough to show all values without truncation.
The following PowerShell script shows how to do it with syntax.
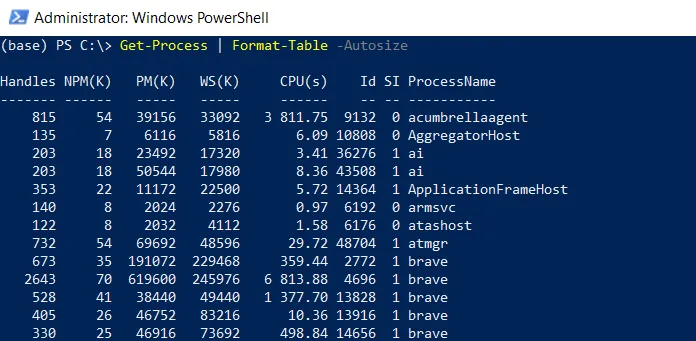
Get-Process | Format-Table -AutoSize
The Get-Process cmdlet retrieves the list of all currently running processes and pipes them to the Format-Table to output to a table with column width adjusted.
The output of the above PowerShell script is given below.
Format-Table Width Using the Width parameter
You can limit the width of a specific column by creating a calculated property with a custom expression.
The following PowerShell script shows how to do it with syntax.
Get-Process | Format-Table `
    @{Label="Name"; Expression={$_.Name}; Width=20}, `
    @{Label="Id"; Expression={$_.Id}; Width=8}, `
    @{Label="CPU"; Expression={$_.CPU}; Width=10}, `
    @{Label="Memory"; Expression={$_.Memory}; Width=12} `
    -AutoSize
In this example, We use the Format-Table cmdlet to format the output of the Get-Process cmdlet. For each column, we specify a calculated property using @{} syntax.
Inside each calculated property, we define the Label, Expression, and Width parameters to adjust the width for each column as needed to set custom widths.
The output of the above PowerShell script is given below.

Format-Table Width Using the Out-String cmdlet
Another way to control the width of the table is by piping the output of the Format-Table to the Out-String with a specific width value.
The following PowerShell script shows how to do it with syntax.
Get-Process | Format-Table | Out-String -Width 300
This example adjusts the width of the entire table. Note that, Out-String with Format-Table may result in less visually appealing output on the screen.
Conclusion
I hope the above article on how to control the width of a format table in PowerShell is helpful to you.
You can find more topics about Active Directory tools and PowerShell basics on the ActiveDirectoryTools home page.