PowerShell offers various methods to write output to a file.
Method 1: Using the Out-File Cmdlet to send output a file
Get-Process | Out-File -FilePath myprocess.txtThis example saves the output of the command to the file.
Method 2: Using the Add-Content cmdlet to write output to a file
Get-Process | Add-Content -Path myprocess.txtThis example writes the output to a file.
Method 3: Append Output to a File using >> operator
Get-Process >> C:\temp\myprocess.txtThis example appends the output to an existing file instead of overwriting it using the >> operator.
Method 4: Using the redirection operator > to save the output to a file
Get-Process > C:\temp\myprocess.txtThis example redirects the output of a command to a file using the > operator.
All of these methods can be utilized to write output to a file or append an output to a file in PowerShell.
The following examples show how to use each of the methods.
Using the Out-File Cmdlet to Send Output to a File
The Out-File cmdlet allows you to send the output to a file directly.
The following PowerShell script shows how to use it with syntax.
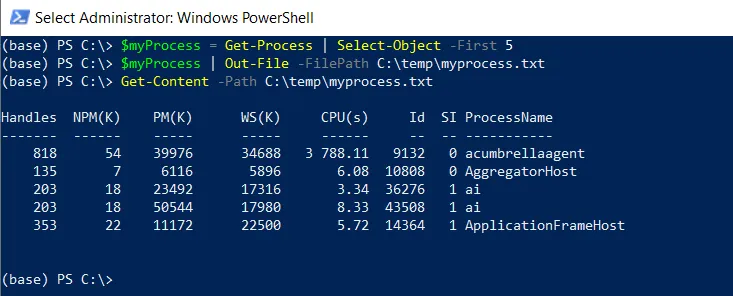
# Select the first 5 process
$myProcess = Get-Process | Select-Object -First 5
# Saves the process output to a file
$myProcess | Out-File -FilePath C:\temp\myprocess.txt

# Read the content of the file
Get-Content -Path C:\temp\myprocess.txt
In this example, the $myProcess variable stores the first 5 processes retrieved using the Get-Process cmdlet. The $myProcess variable pipes to the Out-File cmdlet to save the output to the file named myprocess.txt.
The Get-Content cmdlet is used to read the content of the file named myprocess.txt and display it on the console directly.
The output of the above PowerShell script is given below.
Using the Add-Content cmdlet to Save Output to a File
Another way to write output to a file is by using the Add-Content cmdlet.
The following example shows how to use it with syntax.
Get-Process | Add-Content -Path C:\temp\myprocess.txt
In this example, the Get-Process command retrieves the list of all running processes and pipes the output to the Add-Content to write to a file named myprocess.txt.
This command will also append the output to an existing file. If an existing file contains the information, it appends the output to a file.
Append Output to a File using >> operator
You can use the >> operator to append the output to an existing file instead of overwriting it.
The following example shows how to use it with syntax.
Get-Process >> C:\temp\myprocess.txt
The output of the above PowerShell script writes the output of a command to a file named myprocess.txt.
Using the Redirection Operator > to Save the Output to a File
You can use the > operator to save the output of a command to a file.
The following example shows how to use it with syntax.
Get-Process > C:\temp\myprocess.txt
The output of the above PowerShell script writes the output of a Get-Process command to a file named myprocess.txt.
Conclusion
I hope the above article on how to write output to a file in PowerShell is helpful to you.
You can send output to a file using the Out-File command or >> operator or the Add-Content cmdlet. The Add-Content command also appends output to a file.
You can find more topics about Active Directory tools and PowerShell basics on the ActiveDirectoryTools home page.